It’s a New Era. Virtual Tours are Essential for Real Estate Marketing
Let’s pretend it’s 2015.
You’re meeting a potential buyer at a coffee shop who is interested in looking at a listing you placed online recently. You are early, the Jumpin Joe’s Coffee Shack is filled wall to wall. There are a lot more than several people waiting online and even more off to the side waiting to pick up their order. Controlled chaos.
It’s a beautiful day despite the fact that it’s Monday. Most of the people around you look less than thrilled to be heading off to work. Your barista yells your name, you shuffle through the crowd to grab your overpriced coffee, no croissant today. Tilting your head up and back you hope to spot an empty table. Nothing. There are some stool seats available facing the window. Cafeteria-style seating is a little awkward when meeting a potential new homeowner, but you figure you will take what you can get.
Stay with me.
Just as you turn around a small table opens up. Perfect. Gathering your things, you swing around and claim your territory by placing your coat over the seat. The store is emptying out a little. Good news because less noise creates a more relaxed atmosphere. A more relaxed atmosphere means less stress for Mr. and Mrs. Billings who are walking through the door as we speak to meet with you. Although you never met this lovely couple in person, you recognize them right away. After all, who isn’t part sleuth and all curious these days after back-and-forth communication for 3 weeks? It’s 2015, not 1983. So researching a potential home buyer is easier than ever.
You track them down with a subtle wave of the hand. They smile, put their belongings on the chairs opposite of you, shake your hand, and sit down across from you. In a polite and professional manner, you ask them if they would like anything. They decline. In your head, you smile because you DID NOT want to go through that process of ordering again. You certainly didn’t want to force down more caffeine. The commission on this particular home is huge, and the excitement of a sale is more energizing than the largest cup of coffee within 50 miles.
After some back-and-forth banter the three of you decide to head over to the house to check out the property. You offer to drive so you can use those closing skills you’ve learned for the past 15 years. Long story short, if it’s not too late for that already, you close the deal. You are a real estate superstar. You pat yourself on the back for doing such a fine job. This was all you. You’re the one responsible for doing all the marketing for the listing. You’re the one who put in all the hard work. Hell, you even went out and bought a fancy new camera to shoot the property yourself. Now you can go out and get that fancy new Tesla you’ve been dreaming about.
A wonderful story isn’t it? I’m sorry I just wasted 3 minutes of your time making you read that.
That took place in 2015 when the world was in a normal state. That was then, this is now. There are no public meetings in a coffee shop. There’s no squeezing through crowds to pick up your latte at the coffee shop. Mr. and Mrs. Billings are not walking into the coffee shop. If they did, there would be no handshaking. Hell, today the coffee shop owners are lucky if they are still in business.
It’s today. The real estate market is going through difficult times and what worked just a few short years ago isn’t working today. The fancy camera you bought is a relic compared to other agents who are using their new smartphone to take pictures of their listings. Your marketing efforts aren’t paying off like they used to. What is a real estate agent to do? Give up? Become frustrated? No.
I would like to propose another solution. Virtual Tours. Or as they are sometimes called, 360 Degree Virtual Tours. The nomenclature isn’t important. What is important is that you make virtual tours part of your marketing strategy.
Today, Virtual Tours have become an essential part of real estate marketing. Why bring Mr. and Mrs. Billings to the home when you can bring the home to them? Not so long ago Virtual Tours were complicated to create, confusing to use, and not considered essential to real estate agencies and their agents. They were expensive and time-consuming to produce.
Now they have become essential. If you aren’t using virtual tour technology to show off your listings, you are behind the times. The online listing site Rocket Homes says, “Virtual tour demand by buyers has increased 160% this year and website traffic for virtual tour viewing has increased by 1,400% during the same time.” Those are big numbers that should not be taken lightly.
“Thanks for stating the obvious,” you say. You’re welcome.
“We know virtual tours are an essential part of real estate marketing and sales today but I’m not sure how to get started with them.”
Well, I’m glad you shared that with me because we are going to go through exactly what you need to do to get started. Lucky for you the technology has come a long way and the options you have for capturing Virtual Tours have increased over the past several years.
Let’s Get Started
The first thing you need to do is commit your time. Virtual Tours are not as easy as picking up a smartphone and pressing the screen to take a picture. There is a learning curve involved. The learning curve can be small if you just want to showcase an average Virtual Tour or it can get pretty steep if you want to dive into this technology with a lot of your time and effort so that you can separate yourself from your competition.
Method #1 – Using Zillow’s iPhone app (beginner)

For most realtors, the Zillow iPhone app will get the job done in a reasonable amount of time without putting in a ton of effort. It is not the preferred method Virtual Tour Professionals use to showcase a home but when you are pressed for time it certainly is a viable option to consider. The only thing you will need is an iPhone and a steady hand. Sorry Android users. At the time of this article, Zillow did not have an Android app available. I am assuming that will change in the near future.
1. Download the Zillow 3D Home app to your iPhone®.
2. Open the app and press “Start capture”.
3. Select the room type in the app.
4. Capture the first panorama. Hold the iPhone vertically in front of your chest. Slowly rotate to the right in a full circle. The app will guide your motion and prompt you to adjust your speed.
5. Select “Add” in the app when finished with the first panorama.
6. Capture panoramas in each room you want to list.
7. Review your panoramas for quality and retake any blurry photos.
8. Select “All panoramas complete” and tap “Finish” to upload the tour.
9. Log in to your Zillow dashboard to edit, share, or publish the tour.
If you are going to go the Zillow route here are some recommendations prior to shooting your virtual tour. In fact, these recommendations should be used no matter what platform or medium you use: photographs, videos, or virtual tours.
- Plan your route through the home. This step is often overlooked but can really save you time in the end and make for a better end-user experience.
- Make sure your lens is smudge-free. Small microfiber clothes cost less than $3 so there is no reason not to have one on you at all times.
- Tidy up each room. Make sure any unnecessary items are put away. You want the focus to be on the house, not the kid’s toys or a pair of slippers.
- Turn on all lights. Even in the daytime.
- Turn off fans, TVs, and any moving objects. The last thing you want is blurred objects in your images.
- Open all interior doors. This creates a visual flow and opens up the space for someone looking at photos or virtual tours online.
- Start your tour from outside the front door. Last time we checked, most people enter a home through the front door so this is a good place to start.
We have outlined the basics for getting started with and using Zillow’s app to create a virtual tour. For more in-depth step-by-step information we suggest you visit Zillow’s site for more detailed information on capturing virtual tours.
Method #2 – Using a Theta V (intermediate)

While using Zillow’s app on an iPhone will work for many real estate agents, there are times when you will want more control over the images being produced for your virtual tour. The next step up from using a smartphone would be a 360⁰ camera. This technology has come a long way in recent years and it’s getting better and better as time goes on.
The cheapest and easiest option would be The Ricoh Theta V. You can purchase one between $300 and $400. The Ricoh Theta V is a 360⁰ camera comprised of two 180⁰ fisheye lenses. These fisheye lenses automatically stitch together two separate photos to achieve a 360⁰ effect.
The resolution and quality of the images it produces are adequate. The learning curve is fairly easy and within 10 minutes of being on-site at a property, you can start capturing your first images.
Using The Ricoh Theta V – What you will need:
- An iPhone or Android Phone
- A tripod
- A Ricoh Theta V
- The Ricoh Theta app
- A computer
- Adobe Photoshop
- Adobe Lightroom (optional)
Getting Started
You will need to download the Ricoh Theta app from your respective app downloading service (Google Play, Apple Store) in order to capture photos on the Ricoh Theta V from your smart device.
The first thing to do is walk throughout the home to get a sense of the flow. How will one room virtually connect to another? For larger rooms, anything over 10 ft in length you will need to capture multiple images per room.
1. Mount the Theta V to a tripod or monopod with feet. Using a tripod removes any potential of shake or blur in your images. Also, you don’t want to be in the picture when you are taking the shot.
2. Power on the camera. Three blue lights should appear on the front of the camera: One small dot above the capture button, a blinking WiFi symbol, and a camera. Ensure that the camera mode is selected and not the video mode by pressing the toggle button on the right side of the camera. If the WiFi symbol is not lit, tap the button on the right side that enables the internal WiFi.
3. Next, connect to the camera through your smart device’s WiFi settings by selecting “THETA…..” If this is your first time connecting, you will need to enter the serial number as the password. The serial number is the number subsequent to the “THETA….” This number can be found on the bottom of your camera. NOTE: You will not be able to connect or use the internet on your smart device if you are connected to the camera.
4. Your smartphone is now connected to the camera.
Capturing Photos in the Ricoh Theta App
1. Open the Ricoh Theta app on your smart device.
2. If the app doesn’t open in camera mode automatically, you can access it by pressing the small Ricoh Theta logo located at the bottom right of your screen, as seen below.

3. Prior to taking the picture, go into the settings on the Ricoh Theta V app and set the timer for at least 6 seconds. You do not want to be in the photo. This should give you enough time to get close to the camera to trigger it via the app and leave the room. Make sure no one else is in the room either.
4. Once you’ve clicked and seen the screen above, you’re ready to capture an image from your smart device by pressing the large white button located at the bottom of the screen.
5. After you take a photo, your image will take a few seconds to synthesize (process) and then be stored on both your phone and on the Ricoh Theta V device itself. The Ricoh Theta app will automatically create an album/folder titled “RICOC THETA” in your image gallery on your smart device.
Editing Your Images in Photoshop (the fun part)
1. Connect your smart device to your computer by using a USB cable.
2. Open Adobe Photoshop.
3. In Adobe Photoshop, click on the File > Open. You should be prompted with a file explorer window.
4. Navigate to your smart device which should be located under Devices and Drives.
5. Navigate to the file where your Ricoh Theta folder is located. This is in either a folder titled Pictures of DCIM.
6. Select the photo you wish to edit and then click Open.
7. You should see something similar to the image below.

8. Zoom in on the image using the Zoom Tool located on the left side in the Photoshop menu. Typically at the bottom.
9. When you are zoomed in look for any blemishes or unwanted artifacts or marks in the picture. A hole in the wall, something on the rug, a scratch on the door, etc.
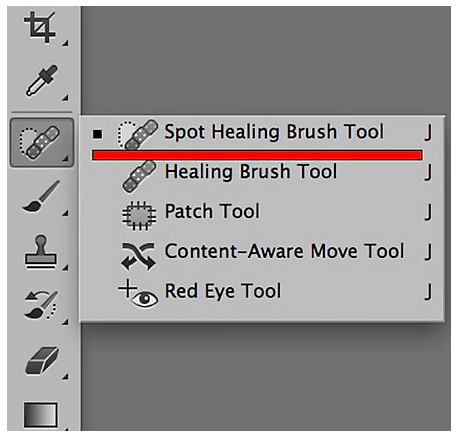
10. In the left-hand menu select the Spot Healing Brush Tool.
11. In your Layers panel you will see the image you are working on. If a lock icon appears next to it click on that to unlock the layer.
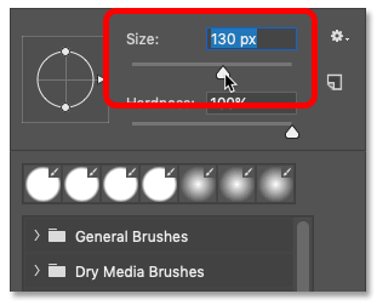
12. Adjust the size of your Spot Healing Brush Tool.
13. Now, use the Spot Healing Tool to click and highlight any areas where you noticed anything that should not be in the image. It should remove those items by identifying the surrounding area and covering up any unwanted things in your picture.
14. In the top menu, select “3D > Spherical Panorama > New Panorama Layer from Selected Layers. This will create a 3D virtual image that you can pan left, right, up, or down with.
15. Panning down to the floor you will notice the tripod stand. You obviously do not want this in your final image to follow the same process in step 13 and use The Spot Healing Tool to remove it.
16. Adjust the image’s brightness, vibrance, saturation, and color if necessary.
17. Save your image by going to the top menu and selecting “3D > Spherical Panorama > Export Panorama.” Save your file name according to the exterior area or interior room where the image was taken.
18. Now you have a flattened image that when uploaded to a Virtual Tour hosting platform will produce an interactive tour.
Our favorite Virtual Tour hosting service is Kuula. They provide all the tools you need to get your virtual tour up and running so I would suggest checking out their features. They also provide the embed code you need for MLS listings so marketing your tour is a very easy process.
In Closing – Other Options
The 2 options mentioned in this article are just some of the options available. Theta has since released a higher-end camera called Theta Z1 which produces even better images because of its larger camera sensor size. The step-by-step process, while similar to the Theta V, is a bit more complex. You have to be familiar with shooting bracketed photos to really take advantage of its capabilities and the entire workflow is more involved. Also, since the beginning of the pandemic, this particular camera has been hard to find because of its demand.
The other option available to real estate agents is of course Matterport. While Matterport is the industry standard we feel their prices are a bit steep. Particularly for their cameras which can cost over $3,000. Theta cameras are now compatible with their software but their software membership could get expensive.
The purpose of this article was to introduce you to the importance of shooting Virtual Tours for your listings and the easiest way to get started. It is our opinion that this is the new future of Real Estate Marketing and it’s not going away any time soon.
Your other option is to hire a Virtual Tour Professional that uses the latest hardware, software, and techniques to make the absolute most of your listings and generate the most leads.
Thank you for taking the time to read this information and we wish you the best of luck. If you have any questions about getting started with Virtual Tours please feel free to contact us directly. We are glad to help.